Microsoft Fabric: Generating Reports with Copilot

Microsoft Fabric Generating Reports with Copilot on Fabric

In Nov 2023, Microsoft announced Microsoft Fabric’s general availability and Public Preview of Copilot in Microsoft Fabric. In a previous post, I explained what Copilot means to Power BI developers, which is valid for other Fabric developers such as data engineers and data scientists as Copilot for Fabric helps with those experiences as well. But the main focus of this blog post is to discuss the requirements, how to enable Copilot, and how to use it from a Power BI development point of view. So, this blog will not discuss other aspects of Copilot in Microsoft Fabric. With that, let’s begin.

Requirements

Right off the bat, Copilot is only available on Power BI Premium capacities or their equivalent Fabric capacities. So, NO it is NOT available on Power BI Pro or Premium Per User or Power BI Embedded Analytics. So the Power BI items you want to use Copilot on must be in a Workspace assigned to a Power BI Premium P1 or Microsoft Fabric F64 capacities or higher.

You also need to have a Contributor role on the premium workspace.

To use Copilot, your Microsoft Fabric Administrator must enable it from the Fabric Admin Portal. This setting is not available in all regions yet, but Microsoft is gradually rolling it out to more regions.

Useful links:

Enabling Copilot on Fabric Admin Portal

As mentioned before, your Fabric Administrator must enable Copilot features within the Admin Portal. Follow these steps to enable Copilot on your tenant after logging into Microsoft Fabric:

  1. Click Settings (the gear icon on the top right of the page)
  2. Click Admin portal
  3. Ensure that the Tenant setting tab is selected
  4. Scroll all the way down to the Copilot and Azure OpenAI Service (preview)​ section

Note

You can also use the search box and search for OpenAI to find the Copilot and Azure OpenAI Service (preview)​ section.

  1. Enable the Users can use a preview of Copilot and other features powered by Azure OpenAI
  2. Click the Apply button
  3. Enable the ​​​Data sent to Azure OpenAI can be processed outside your tenant’s geographic region, compliance boundary, or national cloud instance
  4. Click the Apply button again

That is it. You enabled the Copilot capabilities on your tenant.

The following image shows the preceding steps:
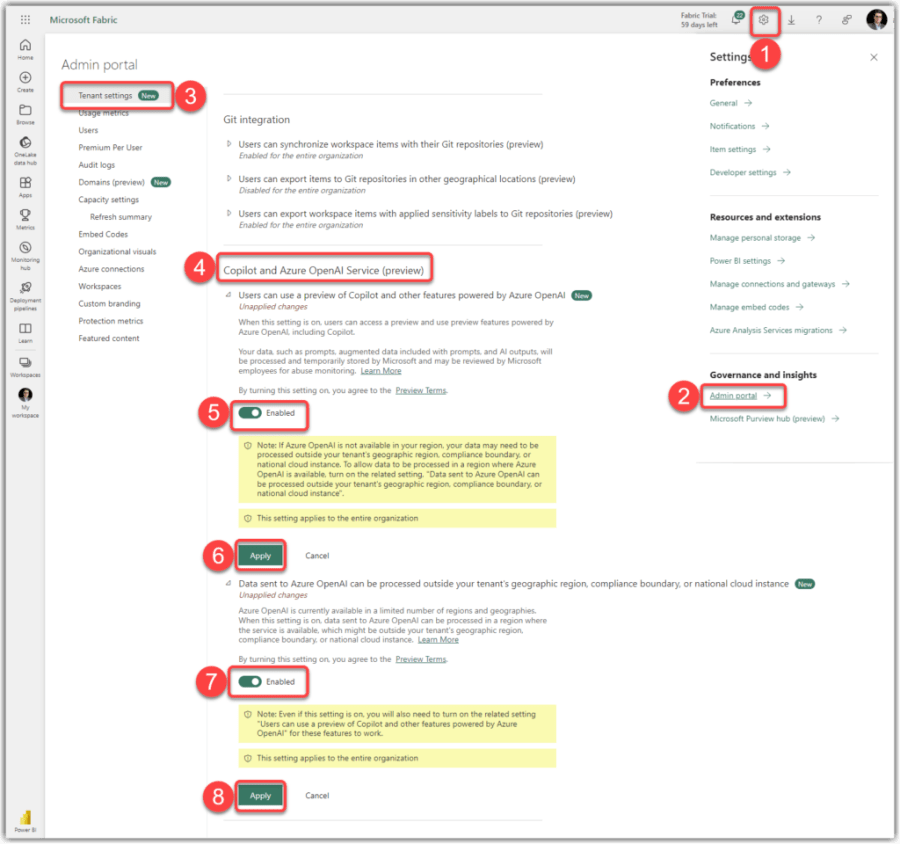
Enabling Copilot for Power BI in Fabric Service Admin Portal
Enabling Copilot in Fabric Admin Portal
Continue reading “Microsoft Fabric: Generating Reports with Copilot”

Exporting Power BI Desktop Data Using Power BI Exporter

Exporting Power BI Desktop Data Using Power BI Exporter

I am excited to announce that our amazing team at Data Vizioner has developed a lightweight and easy to use external tool for Power BI Desktop named Power BI Exporter. The Power BI Exporter is a free community tool available for download here. With External Tools General Availability, you can expect to see more and more External Tools built by our amazing community members. I personally stunned to see many amazing ideas turn into useful tools. Learn more about Power BI announcements about External Tools GA here. I am humbled to be named in the announcement though. So thank you to Microsoft for that.

Let me start with a little background. In the past few years, I wrote a series of blog posts about exporting data from Power BI Desktop and Power BI Service. Those posts are quite popular. They are in the top 10 most visited posts on my website, contributing to about 15% of my website visitors. Here are the previous posts I wrote on this specific topic:

Apart from my website statistics showing many people want to export data from Power BI Desktop, some of my customers asked the same question. They wanted to export the curated data from their data model within Power BI Desktop to CSV format and make the curated data available for their other platforms. While all the methods mentioned in my previous blog posts are working, some users still find them complex. So I thought, we can make it better. We can make a straightforward tool that exports the data with only two clicks. So we started building the Power BI Exporter as a micro-project. We added some more ideas to the original idea of only exporting the data. We thought it is good to export the data along with the table names, column names and relationships. Having that information handy, we can quickly build the same data model as the one we exported its data but using the CSV files as the data sources. The other idea was to pack everything in a ZIP file on the fly, so we have a single ZIP file, including the tables, columns, and relationships. As a result, the first version of the Power BI Exporter is born. In this post I explain how it works.

Downloading and Installing Power BI Exported

You can download Power BI Exporter from its official webpage from Data Vizioner website. You require to enter your email address then click the Download button as shown in the following image:

Downloading Power BI Exporter from Data Vizioner Website
Continue reading “Exporting Power BI Desktop Data Using Power BI Exporter”