Microsoft Fabric: Use Copilot to Generate Data Model Synonyms

Microsoft Fabric: Use Copilot to Generate Data Model Synonyms

One of my older posts explains how to enable Copilot on Fabric and how to use Copilot to generate Power BI reports. In this post, I aim to explain yet another use case for Copilot that can help us to make a better and more useful semantic model in Power BI using synonyms. In an old post published in May 2016, I explained how to use Power BI synonyms to take our Power BI Q&A experience to another level. In that post, I explained how we could use synonyms to translate data model objects in different languages so the end-user could ask questions in their native language and get the results in Power BI. That was such a cool use case for synonyms, I suppose, wasn’t it? Fast track to December 2023, I believe the Q&A is still one of the coolest Power BI features that stands out when demoing the solutions to the customers; therefore, it makes absolute sense to use synonyms to improve the Q&A‘s efficiency and accuracy. This blog post explores the possibility of using Copilot to define synonyms in Power BI Desktop.

Prerequisites

As explained here, we first need to enable Copilot on Fabric Service. Please note that the technique explained in this post requires either Power BI Premium Capacity or at least F64 Fabric capacity and won’t work on PPU, Embedded capacities, Fabric capacities smaller than F64 or Fabric Trial (FT) capacities.

We also need to have the latest version of Power BI Desktop installed on our machine. With that, let’s begin.

Using Power BI Copilot to generate synonyms

While defining synonyms for the semantic model objects significantly helps with the Q&A experience, it is still a cumbersome process if done manually. So, if we meet the prerequisites, we can summon Copilot to the rescue. Follow these steps after opening a Power BI file in Power BI Desktop:

  1. Ensure you’re signed into Fabric service with your account
  2. Click the Insert tab
  3. Select the Q&A visual
  4. On the Q&A visual, click the Q&A Setup button shown with a gear icon
  5. On the Q&A Setup window, you must see a message offering to “Improve Q&A with synonyms from Copilot” on top of the window; click the Add synonyms button

The following image shows the preceding steps:

Improve Q&A with synonyms from Power BI Copilot in Microsoft Fabric
Improve Q&A with synonyms from Copilot
Continue reading “Microsoft Fabric: Use Copilot to Generate Data Model Synonyms”

Quick Tips: Find Power BI Desktop Local Port Number with Model Explorer

Quick Tips: Find Power BI Desktop Local Port Number with Model Explorer

In March 2018, I wrote a blogpost called Four Different Ways to Find Your Power BI Desktop Local Port Number. Last week, Zoe Doughlas from Microsoft left a comment reminding me of a fifth method to get the port which encouraged me to write this quick tip. Thanks to Zoe!

As the name suggests, the blog was about finding Power BI Desktop’s local port number. If you do not have any clue what I mean by local port number, I strongly suggest reading that blog.

This blog focuses on yet another method that wasn’t available back then. Indeed, it is a new feature added to the October 2023 release of Power BI Desktop. This is a Quick Tip so let’s jump straight to the topic and learn how we find the port number (and more) in Power BI Desktop (Oct 2023 and later releases).

Prerequisites

As mentioned, this new feature was added to Power BI Desktop’s October 2023; therefore, we must install that release on our local machine. Indeed, the October 2023 release was packed with many other features, including the Model Explorer (the topic of this blog) and the ability to define calculation groups directly in Power BI Desktop. Many of these features are still in preview; hence, they require enabling.

The following few steps explain how to enable Preview Features in Power BI Desktop:

  1. Open Power BI Desktop and click Settings (the gear icon) from the right pane
  2. On the Options page, from the GLOBAL section, click the Preview features tab
  3. Enable the desired features; for this blog, we need the Model explorer and Calculation group authoring
  4. Click OK

The following image shows the above steps:

Enabling Preview Features in Power BI Desktop

Depending on the selected features, you may need to restart your Power BI Desktop to allow them to enable.

Looking at the above image, some of you may ask “Soheil, are you using an older version of Power BI Desktop?” and I am glad you asked. The answer as always is “It depends”. And, this time it depends on the timing of writing this blog which is early December 2023, and the fact that Power BI Desktop November 2023 was released a couple of weeks ago, therefore, Power BI Desktop October 2023 is kind of OLD! And, YES! I installed Power BI Desktop Nov 2023 for the sake of writing this blogpost.

Continue reading “Quick Tips: Find Power BI Desktop Local Port Number with Model Explorer”

Microsoft Fabric: Generating Reports with Copilot

Microsoft Fabric Generating Reports with Copilot on Fabric

In Nov 2023, Microsoft announced Microsoft Fabric’s general availability and Public Preview of Copilot in Microsoft Fabric. In a previous post, I explained what Copilot means to Power BI developers, which is valid for other Fabric developers such as data engineers and data scientists as Copilot for Fabric helps with those experiences as well. But the main focus of this blog post is to discuss the requirements, how to enable Copilot, and how to use it from a Power BI development point of view. So, this blog will not discuss other aspects of Copilot in Microsoft Fabric. With that, let’s begin.

Requirements

Right off the bat, Copilot is only available on Power BI Premium capacities or their equivalent Fabric capacities. So, NO it is NOT available on Power BI Pro or Premium Per User or Power BI Embedded Analytics. So the Power BI items you want to use Copilot on must be in a Workspace assigned to a Power BI Premium P1 or Microsoft Fabric F64 capacities or higher.

You also need to have a Contributor role on the premium workspace.

To use Copilot, your Microsoft Fabric Administrator must enable it from the Fabric Admin Portal. This setting is not available in all regions yet, but Microsoft is gradually rolling it out to more regions.

Useful links:

Enabling Copilot on Fabric Admin Portal

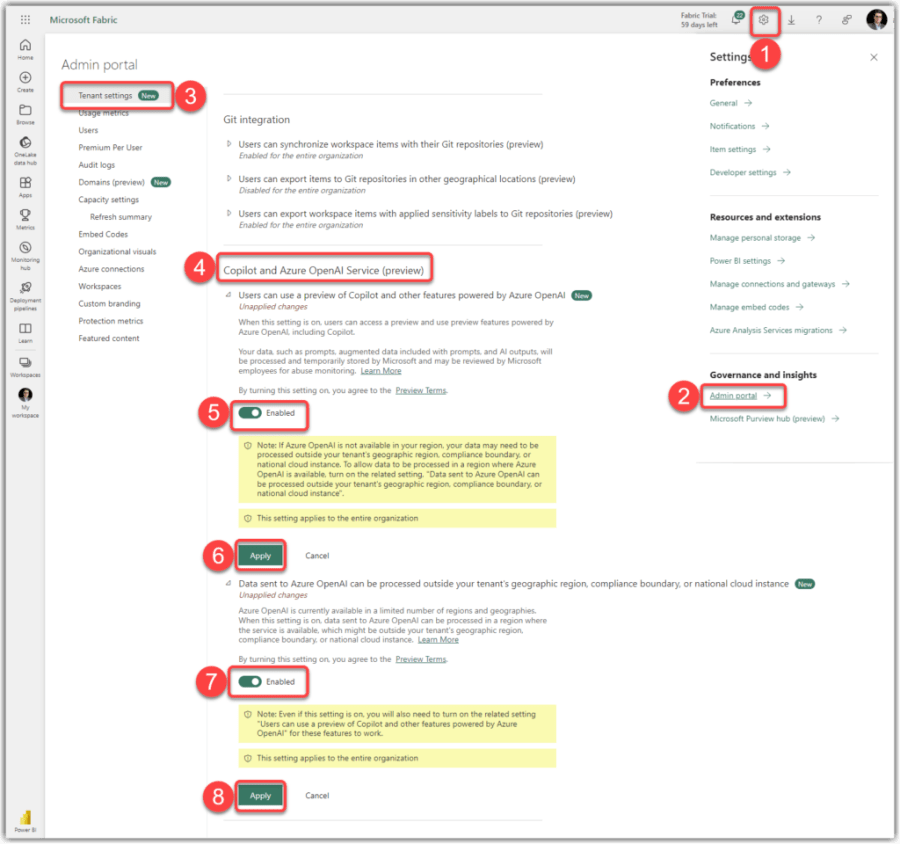
As mentioned before, your Fabric Administrator must enable Copilot features within the Admin Portal. Follow these steps to enable Copilot on your tenant after logging into Microsoft Fabric:

  1. Click Settings (the gear icon on the top right of the page)
  2. Click Admin portal
  3. Ensure that the Tenant setting tab is selected
  4. Scroll all the way down to the Copilot and Azure OpenAI Service (preview)​ section

Note

You can also use the search box and search for OpenAI to find the Copilot and Azure OpenAI Service (preview)​ section.

  1. Enable the Users can use a preview of Copilot and other features powered by Azure OpenAI
  2. Click the Apply button
  3. Enable the ​​​Data sent to Azure OpenAI can be processed outside your tenant’s geographic region, compliance boundary, or national cloud instance
  4. Click the Apply button again

That is it. You enabled the Copilot capabilities on your tenant.

The following image shows the preceding steps:

Enabling Copilot for Power BI in Fabric Service Admin Portal
Enabling Copilot in Fabric Admin Portal
Continue reading “Microsoft Fabric: Generating Reports with Copilot”

Integrating Power BI with AzureDevOps (Git), part 1: Cloud Integration


Power BI is a powerful tool for creating and sharing interactive data visualizations. But how can you collaborate with other developers on your Power BI projects and ensure quality and consistency across your reports? In this series of blog posts, I will show you how to integrate Power BI with Azure DevOps, a cloud-based software development and delivery platform. We can integrate Azure DevOps with Power BI Service (Fabric) as well as Power BI Desktop.
The current post explains how to set up Azure DevOps and connect a Power BI Workspace.
The next blog post will explain how to use it on your local machine to integrate your Power BI Desktop projects with Azure DevOps.

A brief history of source control systems

Before we dive into the details of Power BI and Azure DevOps integration, let’s take a moment to understand what source control systems are and why they are essential for any software project.

Source control systems, also known as version control systems or revision control systems, are tools that help developers manage the changes made to their code over time. They allow developers to track, compare, and roll back changes when necessary and collaborate with other developers on the same project.

There are two main types of source control systems: centralised and distributed. Centralised source control systems use Client-server approach to store all the code and its history in a single server, and developers need to connect to that server to access or modify the code. Examples of centralised source control systems are Microsoft’s Team Foundation Server (TFS) which rebranded to Azure DevOps Server in 2018, IBM’s ClearCase, and Apache’s Subversion.

On the other hand, distributed source control systems use a peer-to-peer approach, allowing each developer to have a local copy of the entire code repository, including its history. Developers can work offline and sync their changes with other developers through a remote server. Examples of distributed source control systems are Git Software and Mercurial, which takes us to the next section. Let’s see what Git is.

What is Git, and why use it?

Git is one of the world’s most popular and widely used distributed source control systems. It was created by Linus Torvalds, the creator of Linux, in 2005. Git has many advantages over centralised source control systems, such as:

  • Speed: Git is fast and efficient, performing most operations locally without network access.
  • Scalability: Git can easily handle large and complex projects, as it does not depend on a single server.
  • Flexibility: Git supports various workflows and branching strategies, allowing developers to choose how they want to organise their code and collaborate with others.
  • Security: Git uses cryptographic hashes to ensure the integrity and authenticity of the code.
  • Open-source: Git is free and open-source, meaning anyone can use it, modify it, or contribute to it.

While Git is pretty good, it has some disadvantages compared with a centralised source control system. Here are some:

  • Complexity: Git has a steep learning curve, especially for users who are new to distributed version control systems. Understanding concepts such as branching, merging, rebasing, and resolving conflicts can be challenging for beginners and sometimes even seasoned Git users.
  • Collaboration challenges: While distributed version control systems like Git enable easy collaboration, they can also lead to collaboration issues. Multiple developers working on the same branch simultaneously may encounter conflicts that need to be resolved, which can introduce complexities and require extra effort.
  • Performance with large repositories: While Git performs pretty well on most operations, it can get abortive when working with large repositories containing many files or a long history of commits. Operations such as cloning or checking out large repositories can be time-consuming.

What is Azure DevOps, and what does it relate to Git?

Azure DevOps is Microsoft’s cloud-based platform providing a set of tools and services for software development. It encompasses a range of capabilities for managing, planning, developing, testing, and delivering software applications. Azure DevOps offers:

  • Azure Boards: A tool for planning, tracking, and managing work items, such as user stories, tasks, bugs, etc.
  • Azure Repos: A tool for hosting Git repositories online, which is the main focus of this blog post.
  • Azure Pipelines: A tool for automating builds, tests, and deployments.
  • Azure Test Plans: A tool for creating and running manual and automated tests.
  • Azure Artifacts: A tool for managing packages and dependencies.

Azure DevOps also integrates with other tools and platforms, such as GitHub, Visual Studio Code, and now, Power BI. This takes us to the next section of this blog post, Integrating Power BI with Azure DevOps.

How to integrate Power BI with Azure DevOps

Now that we understand what Git and Azure DevOps are let’s see how we can integrate Power BI with Azure DevOps.

Integrating Power BI with Azure DevOps has two different integrations. Cloud integration and local machine integration have the following requirements.

Prerequisites

To follow along with this tutorial, you will need:

  • In the cloud:
    • An Azure DevOps Service
    • A Power BI account with one of the following licenses to enable Power BI Workspace integration with Azure DevOps.:
      • Power BI PPU (Premium Per User)
      • Premium Capacity
      • Embedded Capacity (EM/A)
      • Fabric Capacity
  • On your local machine:
    • The latest version of Power BI Desktop (June 2023 or later)
    • Either Visual Studio or VS Code

As stated earlier, this post explains the Cloud integration partTherefore, we require to have an Azure DevOps Service and a Power BI account with a Premium licencing plan in order to integrate Power BI with Azure DevOps.

In the following few sections, we look into more details and go through them together step-by-step.

Continue reading “Integrating Power BI with AzureDevOps (Git), part 1: Cloud Integration”